IOS
Tutorial: Create a custom alert view
Mariana Samardžić
January 25, 2021
8 min read
8 steps to your own UIAlertViewController
The UIAlertViewController is a common and simple-to-use UI component that serves for asking users to enter some data or to notify them about certain events. Unfortunately, this class cannot be customized and that’s why, in this tutorial, I will show you how to create your own completely custom UIAlertViewController.
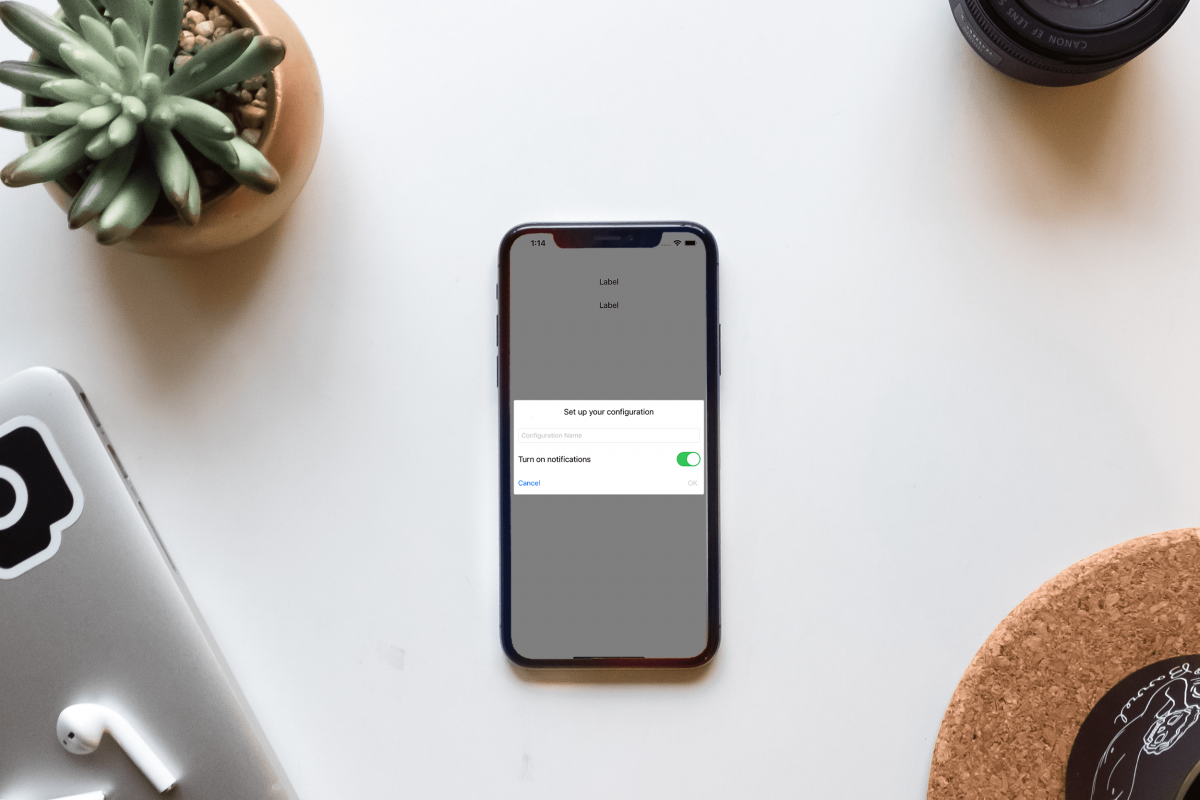
This is what you are going to get:
The code for the project can be seen on:
https://github.com/Crystal-Pigeon/CustomAlert
These are steps you’ll have to take:
- Create the UI
- Create the class and connect the UI with the class
- Present the alert
- Cancel the alert
- Make the background darker
- Move the alert when the keyboard gets shown
- Enable the OK button
- Pass data from the alert to the ViewController
Create the UI
Create a xib file
The first step is to create a xib (XML Interface Builder) file. In this file you can design your custom UIView, similarly to how you design custom UIViewControllers through storyboards. To create this file right click on your project in the project navigator and click new file. Choose the View template and click next. Give a name to your custom alert view and click next.
Create the layout
Open the newly created xib file. Click on the view and open the Attributes Inspector. Change size from inferred to freeform. Now you can resize the view, set it so that it has approximately the intended size.

Create the layout through the interface builder. You can create whatever UI you need. I created a simple view that contains a title, a textfield, a label with a switch, and two buttons.

Create the class and connect the UI with the class
Create a swift file
To add some logic to the created view, you need to create a corresponding swift file. Right-click on your project in the project navigator and click the new file. Choose Swift file. Name this file the same as you named your xib file.
Create a UIView subclass
In that file create a subclass of UIView. This class will represent your custom alert.
import UIKit

class AlertView: UIView {

}
Open the xib file, click on the view and open the Identity Inspector. Set the class to the newly created class.

Now you can connect IBOutlets by dragging the views from the xib file to the swift file.
// MARK: – IBOutlets
@IBOutlet weak var titleLabel: UILabel!
@IBOutlet weak var configurationNameTextField: UITextField!
@IBOutlet weak var switchButton: UISwitch!
@IBOutlet weak var cancelButton: UIButton!
@IBOutlet weak var okButton: UIButton!
Create initial methods
Create a method in which you will perform the basic setup of your view. In this example the background color of the alert view is set to white, a light gray border with a width of 1 is added, and a corner radius is set to 4. Also, the okButton is initially disabled.
<code class="language-swift">
    private func setupView() {
    self.backgroundColor = .white
    self.layer.borderColor = UIColor.lightGray.cgColor
    self.layer.borderWidth = 1
    self.layer.cornerRadius = 4
    self.okButton.isEnabled = false
}
</code>
Create a class method which will be called from the ViewController where you will instantiate this alert. If you don’t know, class methods are the same as static methods, but they can be overridden by subclasses, whereas static methods can never be overridden. The reason why this method is a class method and not a regular method is that this method will be called to create a new instance, which means that it cannot be called on some instance which is the case with regular methods.
This method creates the alert from the specified nib file and calls the basic setup method. Make sure that the parameter nibName is the same as the name of your xib file. If you’re wondering what a nib(NeXTSTEP Interface Builder) is, it is essentially the same as xib, it’s just that the xib file is used while developing, whereas nib files are produced when you create a build.
<code class="language-swift">
class func instanceFromNib() -> AlertView {
    let view = UINib(nibName: "AlertView", bundle: nil).instantiate(withOwner: nil, options: nil)[0] as! AlertView
    view.setupView()
    return view
}
</code>
Present the alert
To be able to show the alert view on a certain screen we will have to create an instance of the AlertView class. Add a lazy instance of the AlertView to the ViewController that will use it.
A lazy modifier ensures that the initial value will not be calculated until the first time this property gets called. This modifier is usually used when the initial value of a property requires complex computation and therefore should not be initialized if it will not be used. That is the case with our custom alert. There is a possibility that the user will not need it.
A closure is being used to initialize this property. It may look like a computed property but this value is calculated only once, which is different in the case of using a computed property.
In the closure, we will call the instanceFromNib class method that we previously created and set the translatedAutoresizingMaskIntoConstraints property to false. This will allow us to create auto layout constraints for the alert.
<code class="language-swift">
private lazy var alertView: AlertView = {
    let view = AlertView.instanceFromNib()
    view.translatesAutoresizingMaskIntoConstraints = false
    return view
}()
</code>
When you want to show the alert on the screen add it as a subview to the main view of the view controller and add constraints. I set the alert in the vertical center of the screen and put 10 point spacing from the right and left edge of the screen.
<code class="language-swift">
@IBAction func openAlert(_ sender: Any) {
      self.view.addSubview(alertView)
    NSLayoutConstraint.activate([
        alertView.leadingAnchor.constraint(equalTo: self.view.leadingAnchor, constant: 10),
        alertView.trailingAnchor.constraint(equalTo: self.view.trailingAnchor, constant: -10),
            alertView.centerYAnchor.constraint(equalTo: self.view.centerYAnchor, constant: 0)
    ])
}
</code>
And now a simple AlertView is created.
… But the cancel button does not work.
Let’s fix it.
Cancel the alert
A great practice to make your custom views reusable in different ViewControllers is to create a delegate protocol. That way, any ViewController that conforms to that protocol will be able to use this alert. Create the delegate protocol and declare a method for removing the alert.
<code class="language-swift">
protocol AlertViewDelegate {
    func removeAlert(sender: AlertView)
}
</code>
Add an optional delegate property to your alert class. This property has to be public because it will be initialized in the ViewController where the alert gets used.
<code class="language-swift">
// MARK: - Properties
var delegate: AlertViewDelegate?
</code>
Drag an IBAction from the cancel button and call the removeAlert method of the delegate.
<code class="language-swift">
@IBAction func cancel(_ sender: Any) {
    self.delegate?.removeAlert(sender: self)
}
</code>
The ViewController should implement the alertViewDelegate protocol. All you have to do is remove the alert from superview.
<code class="language-swift">
extension ViewController: AlertViewDelegate {
    func removeAlert(sender: AlertView) {
        sender.removeFromSuperview()
    }
}
</code>
Set the delegate property of the alert to self when initializing it in the ViewController.
<code class="language-swift">
private lazy var alertView: AlertView = {
    let view = AlertView.instanceFromNib()
    view.translatesAutoresizingMaskIntoConstraints = false
    view.delegate = self
    return view
}()
</code>

Ok, the cancel button now works, but would it not be nice if the background got a little darker so that the alert stands out more?
Make the background darker
Create a UIView called backgroundView in the ViewController. Set the background color and the alpha to your linking. Also set the translatesAutoresizingMaskIntoConstraints property to true, so that we can add our own constraints.
<code class="language-swift">
private lazy var backgroundView: UIView = {
    let view = UIView()
    view.backgroundColor = .black
    view.alpha = 0.5
    view.translatesAutoresizingMaskIntoConstraints = false
    return view
}()
</code>
Just before the code for showing the alert view add this code. First we will add the background as a subview and then pin the background to the edges of the view.
<code class="language-swift">
self.view.addSubview(backgroundView)
NSLayoutConstraint.activate([
            backgroundView.leadingAnchor.constraint(equalTo: self.view.leadingAnchor, constant: 0),
            backgroundView.trailingAnchor.constraint(equalTo: self.view.trailingAnchor, constant: 0),
            backgroundView.topAnchor.constraint(equalTo: self.view.topAnchor, constant: 0),
            backgroundView.bottomAnchor.constraint(equalTo: self.view.bottomAnchor, constant: 0)
        ])
</code>
Also, you will have to remove the background view when the alert gets canceled. Add this line of code in the view controllers implementation of the AlertViewDelegate protocol’s method removeAlert()
<code class="language-swift">
self.backgroundView.removeFromSuperview()
</code>
Now the alert stands out much better.

But how can a user now click on cancel when the keyboard is shown?
Let’s add code to fix this case.
Move the alert when the keyboard gets shown
We could move the alert up by adding a constant to the constraint that centers the alert view vertically. But right now that constraint is not reachable anywhere in the class. Therefore, let’s create a property that will represent that constraint.
Create a constraint property
Declare a new property alertViewConstraint in the view controller.
<code class="language-swift">
var alertViewConstraint: NSLayoutConstraint!
</code>
Instantiate it in viewDidLoad method. This constraint defines that the alert is centered vertically in the view controller.
<code class="language-swift">
override func viewDidLoad() {
    super.viewDidLoad()
    self.alertViewConstraint = NSLayoutConstraint(item: self.alertView, attribute: .centerY, relatedBy: .equal, toItem: self.view, attribute: .centerY, multiplier: 1, constant: 0)
}
</code>
In the method where you show the alert replace this:
<code class="language-swift">
NSLayoutConstraint.activate([
    alertView.leadingAnchor.constraint(equalTo: self.view.leadingAnchor, constant: 10),
    alertView.trailingAnchor.constraint(equalTo: self.view.trailingAnchor, constant: -10),
    alertView.centerYAnchor.constraint(equalTo: self.view.centerYAnchor, constant: 0)
])
</code>
… With this:
<code class="language-swift">
NSLayoutConstraint.activate([
    alertView.leadingAnchor.constraint(equalTo: self.view.leadingAnchor, constant: 10),
    alertView.trailingAnchor.constraint(equalTo: self.view.trailingAnchor, constant: -10),
    alertViewConstraint
])
</code>
The alert should work the same as it did before these changes.
Move the alert view
Next, create two methods. The first one will be called when the keyboard gets shown and in this method, we will raise the alert view up by 100 points.
The second method will be called when the keyboard disappears from the screen, and the alert will be put back in its original position.
You can move the keyboard by fewer or more points, it’s up to you.
<code class="language-swift">
@objc func keyboardWillShow(notification: NSNotification) {
    self.alertViewConstraint.constant = -100
}

@objc func keyboardWillHide(notification: NSNotification) {
    self.alertViewConstraint.constant = 0
}
</code>
In the viewdidLoad method add observers for keyboardwillhide and keyboard will show events. And call the method that will set the tap gesture on the screen.
<code class="language-swift">
    NotificationCenter.default.addObserver(self, selector: #selector(keyboardWillShow), name: UIResponder.keyboardWillShowNotification, object: nil)
    NotificationCenter.default.addObserver(self, selector: #selector(keyboardWillHide), name: UIResponder.keyboardWillHideNotification, object: nil)
</code>
Hide keyboard when the user taps anywhere on the screen
Add this code to hide the keyboard when the user touches anywhere on the screen.
<code class="language-swift">
func hideKeyboardWhenTappedAround() {
    let tap: UITapGestureRecognizer = UITapGestureRecognizer(target: self, action: #selector(dismissKeyboard))
    tap.cancelsTouchesInView = false
    self.view.addGestureRecognizer(tap)
    }

@objc func dismissKeyboard() {
    self.view.endEditing(true)
    }
</code>
In viewDidLoad method call the hidekeyboardWhenTappedAround method.
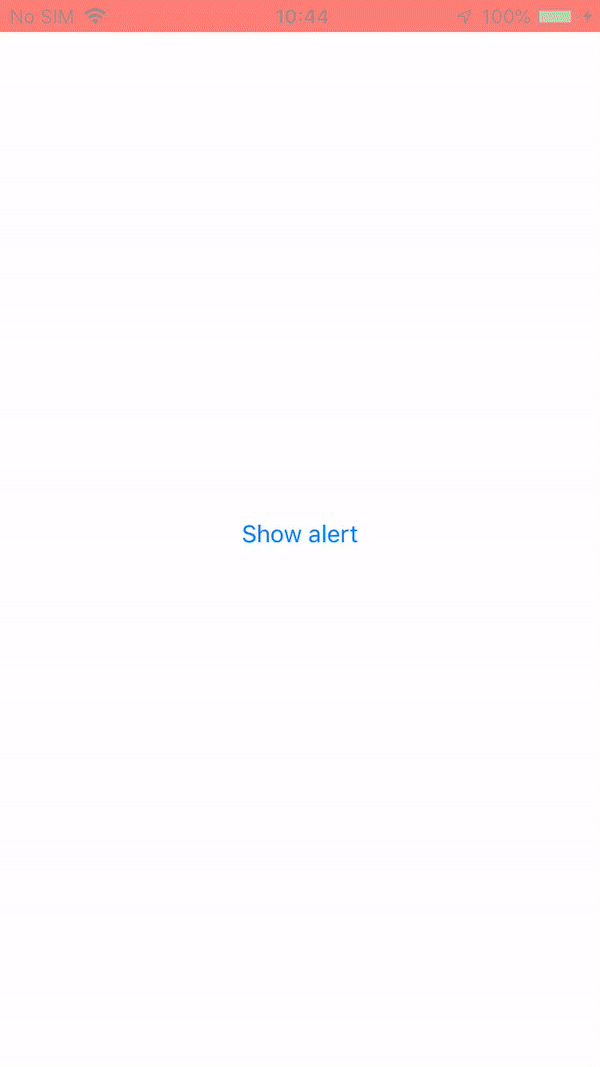
And here’s the final result you’ll get:

Enable the OK button
You should decide when the ok button should be enabled based on your business logic. In this example, the button should be enabled only when there is some text in the text field.
Firstly, extend the String class and add a new property that will check if the string is blank. The reason why I created a new property instead of using the well-known isEmpty property of String is that if the string contains just whitespaces the isEmpty property will return true and that is not what I want here.
<code class="language-swift">
extension String {
    var isBlank: Bool {
        return allSatisfy({ $0.isWhitespace })
    }
}
</code>
Secondly, create a method that will enable the button if the textfield is not blank and disable the button when the textfield is blank.
<code class="language-swift">
@objc private func editingChanged() {
    if self.configurationNameTextField.text!.isBlank {
        self.okButton.isEnabled = false
    } else {
        self.okButton.isEnabled = true
    }
}
</code>
Lastly, add this line to setupView method. Whenever any change happens to the textfield the method editingChanged will get called.
<code class="language-swift">
self.configurationNameTextField.addTarget(self, action: #selector(editingChanged), for: .editingChanged)
</code>
Now the alert view looks like this:

The last thing to do is to transfer data to the view controller.
Pass data from the alert to the ViewController
Add a new method to the delegate protocol. This method will pass data from the alert to the alert’s delegate.
<code class="language-swift">
protocol AlertViewDelegate {
    func removeAlert(sender: AlertView)
    func handleData(name: String, isAllowed: Bool)
}
</code>
Implement the method in the ViewController. In this example, the data will be shown on two labels in the ViewController.
<code class="language-swift">
func handleData(name: String, isAllowed: Bool) {
    configurationName.text = name
    if isAllowed {
        notificationsAllowedLabel.text = "Notifications are allowed"
    } else {
        notificationsAllowedLabel.text = "Notifications are not allowed"
    }
}
</code>
Drag and IBAction from the ok button in the storyboard to the class code. First, call the removeAlert method from the delegate because the alert should disappear from the screen after the user has clicked ok, and then call the handleData methods from the delegate.
<code class="language-swift">
@IBAction func ok(_ sender: Any) {
    self.delegate?.removeAlert(sender: self)
    self.delegate?.handleData(name: self.configurationNameTextField.text!, isAllowed: switchButton.isOn)
}
</code>
Congratulations! Your alert is finished!

Care to share?
Read next

Business
Fit for the Future: Our Global Identity
When did you realize it was time for changes in your life? Those moments when you just knew it was time to shake things up to make your future align with the vision you’ve always had? That’s what we’re diving into in this blog. Four years ago, Skenit was born out of a need to […]

Uncategorized
Google I/O 2024 for Flutter Developers
Mobile app development is buzzing with excitement after the big announcements at Google I/O 2024. The latest updates for Flutter and Dart are here, bringing new features and improvements that promise to make multi-platform app development even better. Flutter 3.22: What’s New? The newest version, Flutter 3.22, brings exciting enhancements. Flutter continues to be a […]